Environment Management
Creating Environments
# Create with a named template (env_name, template_name, repo_url, odoo_image)
oduflow call create_environment feature-login "" myproject https://github.com/owner/repo.git odoo:19.0

# Create without a template (fresh Odoo with -i base)
oduflow call create_environment feature-login "" none https://github.com/owner/repo.git odoo:19.0

# Create with JSON arguments (more explicit)
oduflow call create_environment '{"branch":"feature-login","template_name":"myproject","repo_url":"https://github.com/owner/repo.git","odoo_image":"odoo:19.0"}'

# Inject container environment variables (comma-separated KEY=VALUE)
oduflow call create_environment '{"branch":"feature-login","template_name":"myproject","env_vars":"WORKERS=2,LIMIT_TIME_CPU=600"}'
env_vars are added on top of the database connection variables (HOST/USER/PASSWORD). They are stored on the container and can later be replaced with update_environment.
When creating an environment, Oduflow:
- Clones the repository — shallow clone (
--depth 1) for speed - Creates the database —
CREATE DATABASE ... TEMPLATE oduflow_template_{team_id}_{name}for instant copy, or empty DB whentemplate=none - Mounts the filestore overlay — fuse-overlayfs with the template as lower layer
- Detects UID/GID — runs
idin the Odoo image to set correct file ownership - Installs dependencies — auto-installs from
.oduflow/apt_packages.txtand.oduflow/requirements.txt(the latter falls back to the repo root) if present - Configures Odoo — uses repo's
.oduflow/odoo.confif available, otherwise the default template - Starts the container — with
--dev=xmlfor hot-reloading XML/QWeb changes - Initializes base — when
template=none, runsodoo -i base --stop-after-init
Private repository authentication
For private repos, configure credentials first:
Credentials are stored in the git credential store. Subsequent create_environment calls can use the clean URL without credentials.
Auto-dependency installation
Place these files in your repository for automatic installation during environment creation:
.oduflow/requirements.txt — Python packages installed via pip. Oduflow looks in
.oduflow/ first and falls back to a requirements.txt in the repository root (for
compatibility with conventions used elsewhere, e.g. odoo.sh):
.oduflow/apt_packages.txt — System packages installed via apt. This is an
Oduflow-specific convention and is read only from .oduflow/ (no repo-root fallback):
Database Sanitization
When an environment is created from a template, Oduflow automatically sanitizes the database to prevent the test instance from sending real emails or polling mailboxes. This is enabled by default (sanitize=True).
Sanitization uses a two-tier approach:
- Team-level scripts from
{team_data_dir}/odoo_sanitize/— managed by the administrator, shared across all environments in the team - Per-project scripts from
.odoo_sanitize/in the repository root — managed by the developer, specific to the project
Both folders support .sql and .py files, executed in alphabetical order (first all .sql, then all .py). Team-level scripts run first, then per-project scripts.
Team-level sanitization
On startup, the folder {team_data_dir}/odoo_sanitize/ is created and seeded with a default script:
01_disable_mail.sql — disables incoming and outgoing mail servers:
-- Disable incoming mail servers (fetchmail)
UPDATE fetchmail_server SET active = false WHERE active = true;

-- Disable outgoing mail servers
UPDATE ir_mail_server SET active = false WHERE active = true;
The team administrator can add, modify, or remove scripts in this folder to control sanitization for all environments in the team.
Tip
To disable additional cron jobs team-wide, create {team_data_dir}/odoo_sanitize/02_disable_crons.sql:
Per-project sanitization
You can add project-specific sanitization by placing scripts in a .odoo_sanitize/ folder in your repository root:
| File type | Execution method |
|---|---|
*.sql |
Executed directly against the environment database via psql |
*.py |
Executed inside the Odoo container via python3 -c |
Example SQL script (.odoo_sanitize/01_clean_partners.sql):
Example Python script (.odoo_sanitize/02_reset_passwords.py):
import os, psycopg2
conn = psycopg2.connect(
    host=os.environ["DB_HOST"],
    dbname=os.environ["ODOO_DB"],
    user=os.environ["DB_USER"],
    password=os.environ["DB_PASSWORD"],
)
with conn.cursor() as cr:
    cr.execute("UPDATE res_partner SET email = 'test@example.com' WHERE email IS NOT NULL")
    conn.commit()
conn.close()
Python scripts receive the following environment variables: ODOO_DB, DB_HOST, DB_USER, DB_PASSWORD.
Disabling sanitization
Pass sanitize=false when creating an environment to skip all sanitization (both team-level and per-project):
oduflow call create_environment '{"branch":"my-branch","template_name":"mytemplate","repo_url":"https://...","odoo_image":"odoo:19.0","sanitize":false}'
Note
Sanitization only runs when creating from a template. Environments created without a template (template=none) are not sanitized since they start with a clean database.
Lifecycle Management
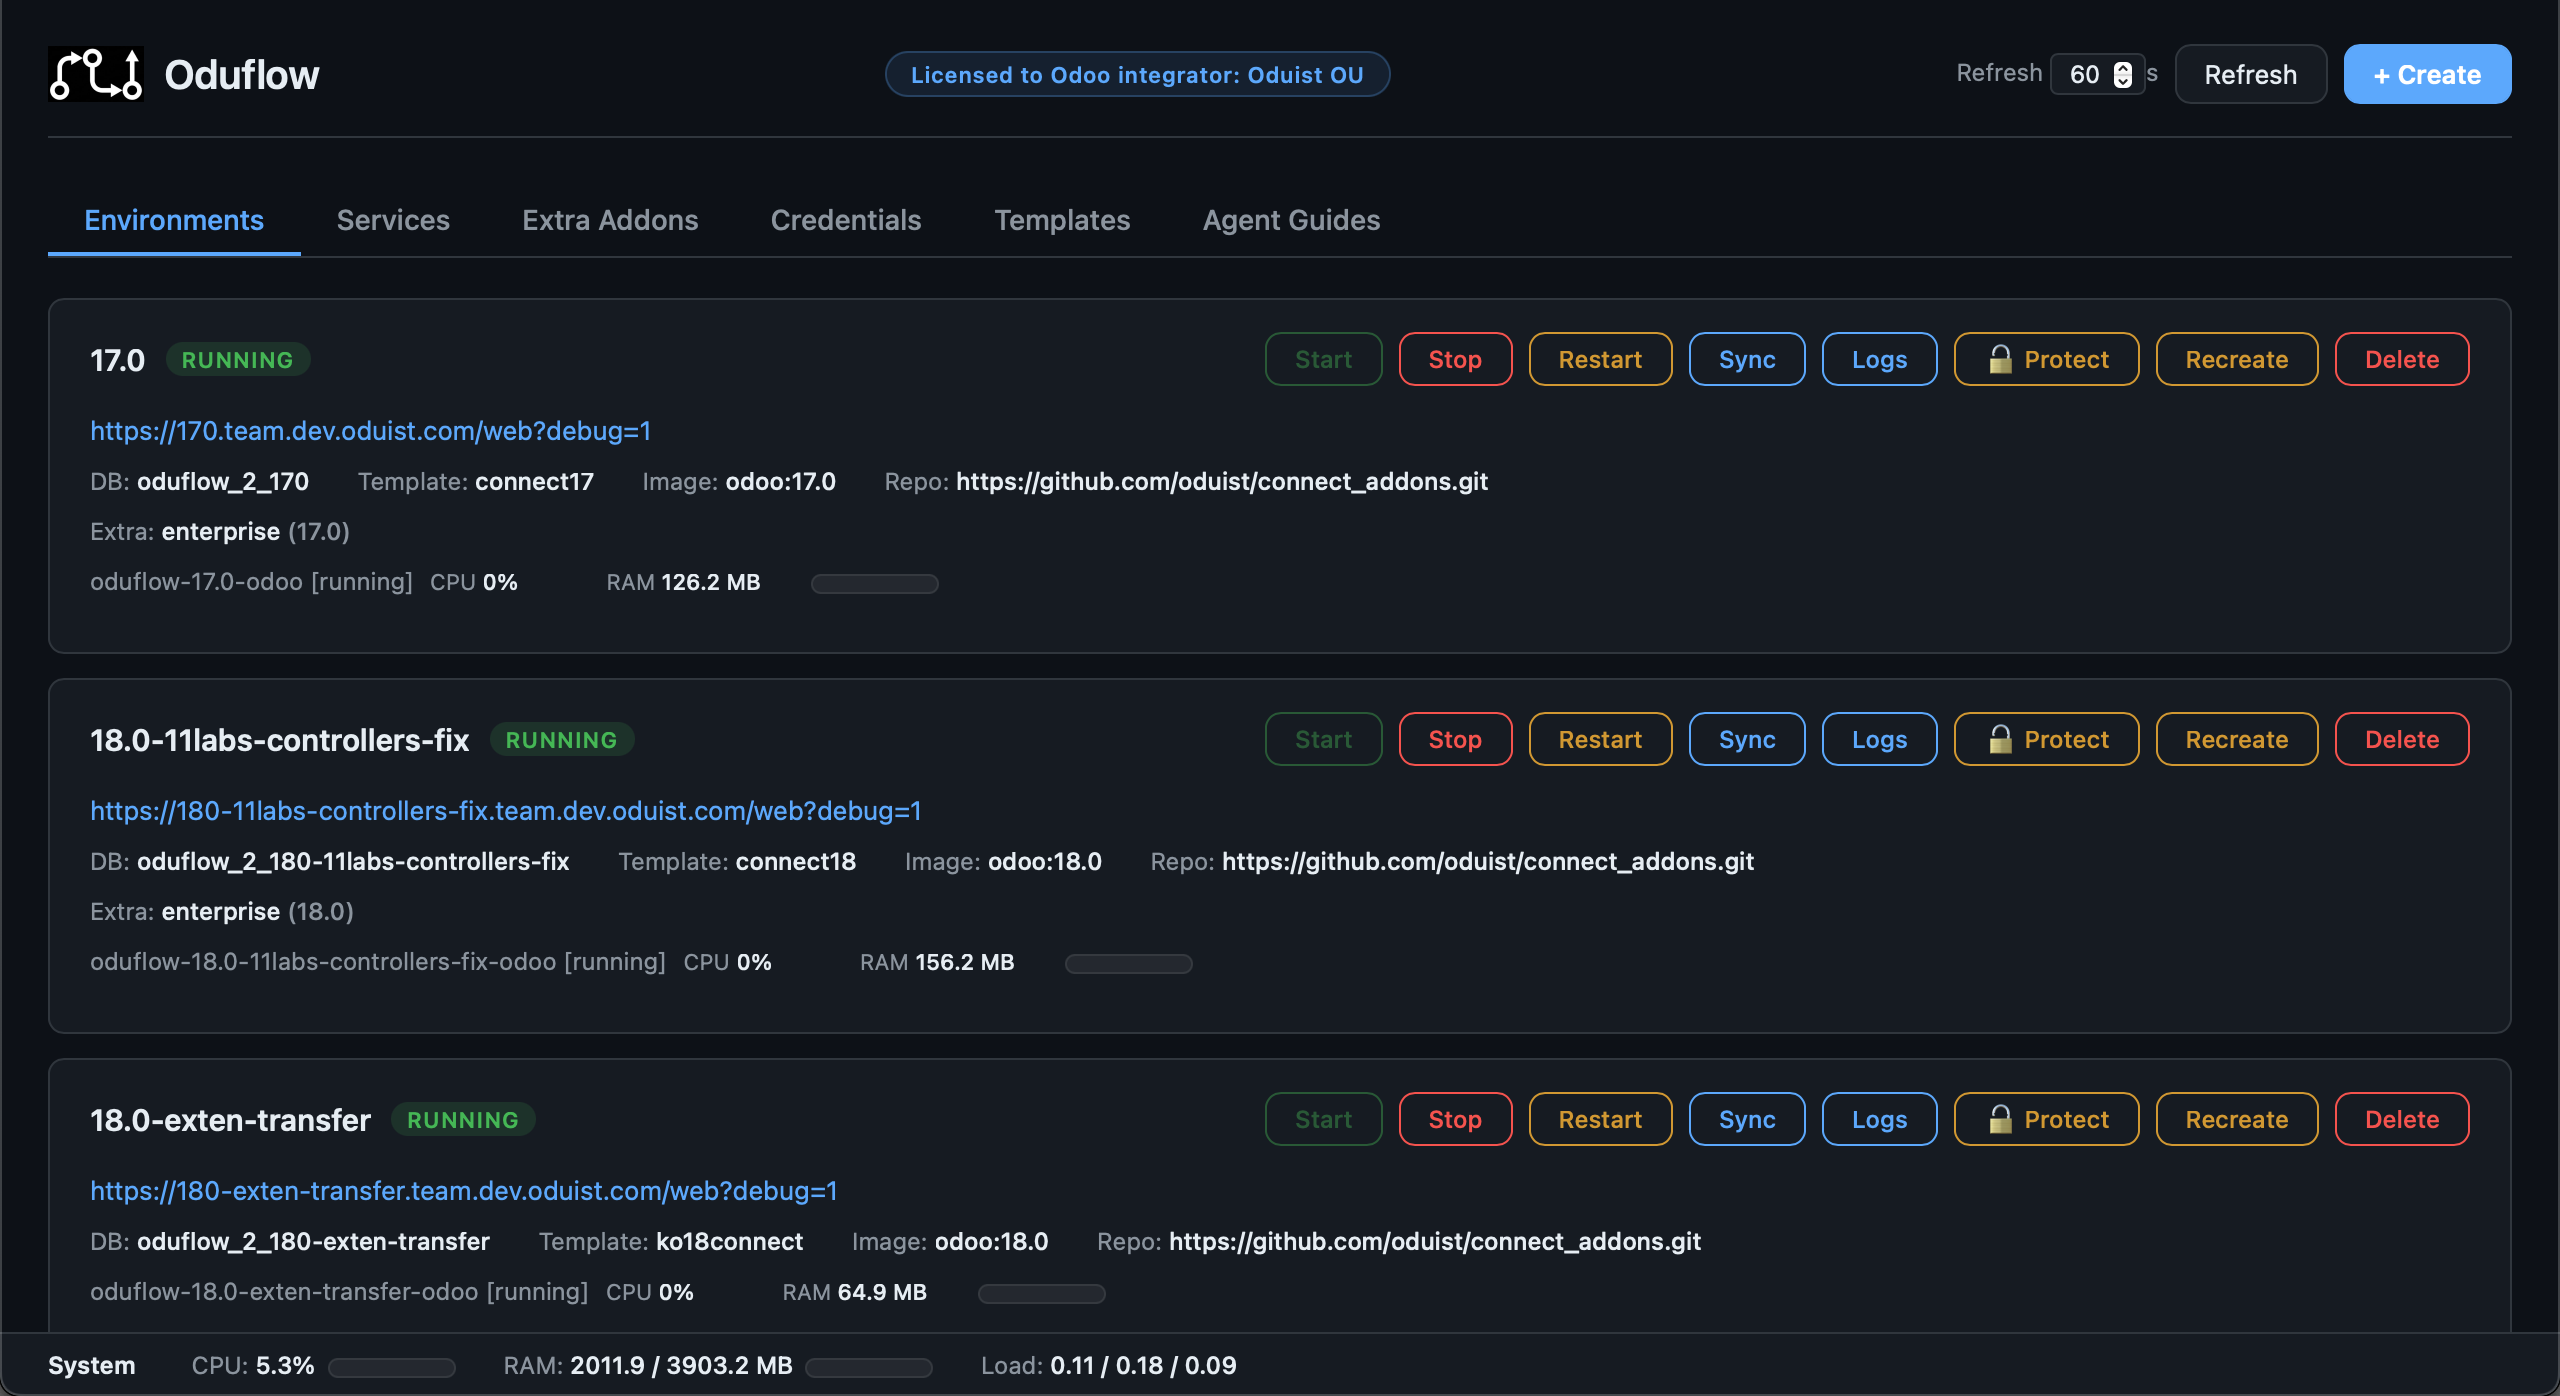
# List all environments with status, URL, image, and repo info
oduflow call list_environments

# Check detailed environment info (DB, URL, repo, image, CPU/RAM stats)
oduflow call get_environment_info feature-login

# Stop an environment (preserves data)
oduflow call stop_environment feature-login

# Start a stopped environment
oduflow call start_environment feature-login

# Restart the Odoo container
oduflow call restart_environment feature-login

# Re-create the container (keeps database and filestore)
oduflow call update_environment feature-login

# Switch image and/or replace env vars (keeps database and filestore)
oduflow call update_environment feature-login "WORKERS=4,LIMIT_TIME_CPU=900" odoo:19.0

# Tear down everything (container, database, filestore, workspace)
oduflow call delete_environment feature-login
Recreating Environments
The Recreate action (available via the Web Dashboard and REST API) deletes an environment and immediately creates a fresh one using the same parameters (repo URL, Odoo image, template, extra addons). This is useful when you want a clean slate without manually re-entering all environment settings.
Recreate reads the original configuration from the container's Docker labels, so all parameters (repo URL, image, template, extra addons, git user) are preserved automatically.
Automatic Stop and Cleanup
Environments accumulate: agents create them faster than anyone cleans up. A background sweep inside the Oduflow server keeps the fleet tidy:
- Auto-stop — a running environment with no work for
auto_stop_hours(default 48) is stopped. Work means any env-scoped MCP tool call (pull_and_apply, module installs, tests, logs, shell, queries, ...) or a lifecycle action in the Web Dashboard. Listing environments and dashboard polling do not count. - Auto-delete — a stopped environment that nobody started for
auto_delete_hours(default 72) after it stopped is deleted entirely (container, database, filestore, workspace). Manual stops count too: a stopped environment is on the deletion clock.
Keeping an environment alive. Protected environments (protect_environment
or the Protect action in the dashboard) are exempt from both auto-stop and
auto-delete — protect anything you hand to customers for testing. Keeping an
environment running (any activity resets the idle clock) also keeps it safe
from deletion, since only stopped environments are ever deleted.
Waking up. Container-level tools start a stopped environment
automatically and prepend a short note to the response
(Note: environment was stopped; started it ...): pull_and_apply, module
installs/upgrades, run_odoo_tests, run_odoo_shell, run_odoo_command,
file tools (read/write/search_in_odoo), http_request_to_odoo and
reset_admin_password. Read-only and diagnostic tools never wake an
environment: run_db_query and list_installed_modules go to the shared
PostgreSQL, and get_environment_logs reads logs of stopped containers —
useful when diagnosing why something died.
The dashboard shows each environment's last activity (Active: 2h ago) and,
for stopped ones, when and how it stopped (Stopped: 1d ago (auto)). Every
auto-stop/auto-delete is logged by the server
(Auto-stopped environment 'x' (idle longer than 48h)).
Configure (or disable with 0) in oduflow.toml:
[lifecycle]
auto_stop_hours = 48    # stop after N hours without work; 0 disables
auto_delete_hours = 72  # delete N hours after the environment stopped; 0 disables
Viewing Logs
# Last 100 lines (default)
oduflow call get_environment_logs feature-login

# Last 500 lines
oduflow call get_environment_logs feature-login 500
Installing and Upgrading Modules
# Install modules (odoo -i)
oduflow call install_odoo_modules feature-login sale,crm,website

# Upgrade modules (odoo -u)
oduflow call upgrade_odoo_modules feature-login sale,crm
Running Tests
This runs odoo --test-enable --stop-after-init --workers 0 --http-port 8089 --gevent-port 8090 -u
<modules> inside the container. The module must already be installed — tests run via an upgrade
(-u); -i on an already-installed module is a no-op that never enters the test phase ("0 of 0
tests"). Because --no-http has no effect under --test-enable (tests require a live HTTP
server), the test server's HTTP and gevent ports are moved off the defaults (8069/8072) — already
held by the running Odoo container — to avoid a port conflict. On Odoo 15.0 and earlier the port
flag is --longpolling-port instead (Odoo 16.0 renamed it to --gevent-port); Oduflow detects the
environment's Odoo version and uses the right one automatically. --workers 0 makes the run
deterministic (Odoo recommends single-worker mode for unit tests).
Smart Pull — Intelligent Change Detection
The pull_and_apply tool is one of Oduflow's most powerful features. It pulls the latest changes from the remote repository and automatically determines the minimal action required:
How it works
After git pull --rebase, Oduflow compares HEAD before and after, then classifies every changed file:
| Changed File | Analysis | Action |
|---|---|---|
__manifest__.py (new module) |
No previous manifest exists | Install the module |
__manifest__.py (version changed) |
version key differs |
Upgrade the module |
__manifest__.py (data/assets/demo/qweb changed) |
File lists in manifest changed | Upgrade the module |
*.py with fields.* changes |
Field definitions added/removed/modified | Upgrade the module |
*.py (no field changes) |
Business logic change | Restart the container |
security/*.xml |
Access control or record rules | Upgrade the module |
*.xml (not in security/) |
Views, actions, data | Refresh (hot-reloaded via --dev=xml) |
*.js |
Frontend assets | Refresh (hot-reloaded via --dev=xml) |
Action priority
install > upgrade > restart > refresh
If any module needs installation, all pending upgrades are also executed. If only Python files changed (without field modifications), a container restart is sufficient. If only XML/JS changed, no server-side action is needed — just refresh the browser.
Note
pull_and_apply updates only the main project repository. Extra addons repositories are pinned to the commit they were deployed with and are not affected. See Extra Addons — Updating for details.
Module detection
Oduflow walks up from each changed file to find the nearest __manifest__.py, correctly identifying which Odoo module a file belongs to, even in nested directory structures.
Reading Files Inside Environments
Use read_file_in_odoo to inspect files and directories inside the Odoo container without constructing shell commands:
# Read Odoo source code
oduflow call read_file_in_odoo feature-login /usr/lib/python3/dist-packages/odoo/addons/sale/models/sale_order.py

# Read a specific line range (lines 100–200)
oduflow call read_file_in_odoo feature-login /usr/lib/python3/dist-packages/odoo/addons/sale/models/sale_order.py "100:200"

# List a directory
oduflow call read_file_in_odoo feature-login /mnt/extra-addons/

# Check the generated Odoo config
oduflow call read_file_in_odoo feature-login /etc/odoo/odoo.conf

# Verify file presence after pull_and_apply
oduflow call read_file_in_odoo feature-login /mnt/extra-addons/my_module/__manifest__.py
- If the path is a directory, returns a listing (like
ls -la). - If the path is a text file, returns its contents (up to 100KB by default).
- Binary files are not supported — use
run_odoo_commandfor binary operations. - The optional
read_rangeparameter accepts a"START:END"format (e.g."1:50","100:200") to read only specific lines.
Tip
Prefer read_file_in_odoo over run_odoo_command with cat or ls commands — it handles file type detection, size limits, and binary file rejection automatically.
Executing Commands Inside Environments
Run arbitrary shell commands inside the Odoo container:
# List addon files
oduflow call run_odoo_command feature-login "ls /mnt/extra-addons"

# Check Python version
oduflow call run_odoo_command feature-login "python3 --version"

# Run a Python script
oduflow call run_odoo_command feature-login "python3 -c 'import odoo; print(odoo.release.version)'"

# Install a package as root
oduflow call run_odoo_command feature-login "pip3 install phonenumbers" root

# Debug database
oduflow call run_odoo_command feature-login "psql -h oduflow-db -U odoo -d oduflow_feature-login -c 'SELECT count(*) FROM res_partner;'"
The user parameter defaults to odoo. Use root for privileged operations (installing packages, modifying system files).
Interactive Terminal
The Web Dashboard provides an interactive Odoo Python shell directly in the browser via WebSocket. It launches odoo shell connected to the environment's database, allowing you to inspect and manipulate Odoo models in real time.
The terminal is accessible from the environment card in the Web Dashboard. It supports:
- Full interactive Python REPL with Odoo ORM access (
self.env['res.partner'].search([])) - Terminal resizing (adapts to browser window)
- Standard TTY features (colors, line editing)
The WebSocket endpoint is ws://<host>:<port>/api/environments/{branch}/terminal.
Note
The terminal requires the environment container to be running. If the container is stopped, the terminal will display an error message.
Environment Protection
Environments can be protected from accidental deletion. A protected environment cannot be deleted until protection is removed.
Protection state is stored as a .protected marker file in the environment's workspace directory, so it survives container rebuilds and restarts.
When an environment is protected:
- Delete is blocked with a
ProtectedError - Stop is also blocked with a
ProtectedError - Other operations (restart, sync, install/upgrade modules) are unaffected
Via REST API
# Protect an environment
curl -X POST http://localhost:8000/api/environments/feature-login/protect

# Unprotect an environment
curl -X POST http://localhost:8000/api/environments/feature-login/unprotect
Via Web Dashboard
Click the 🔓 Protect button on any environment card to toggle protection. When protected:
- The button shows 🔒 Protected (highlighted)
- The Delete button is disabled
- Attempting to delete via MCP or API returns a
ProtectedError